DoNT
Do Not Think!!!
120 Entries : Results for 01010101
Ubuntu + PHP Development Environment - 452번째 이야기
- Posted
- Filed under 01010101
ubuntu 12.04
apm + xdebug
eclipse + pdt + aptana plugin + mylyn
bitbucket (git + issue tracker)
ubuntu 12.04
http://www.ubuntu.com/apm + xdebug
http://dont.pe.kr/tt/414eclipse + pdt + aptana plugin + mylyn
download eclipsehttp://eclipse.org/
install pdt
http://www.eclipse.org/projects/project.php?id=tools.pdt
install aptana plugin
http://www.aptana.com/
install mylyn
bitbucket
create repository & issue trackerhttps://bitbucket.org/
mylyn bitbucket connector
install mylyn bitbucket connectorhttps://bitbucket.org/pplupo/bitbucket-mylyn-connector/wiki/Home


- Tag apache, APM, Aptana, bitbucket, eclipse, git, mylyn, mysql, php, Programming, TDP, ubuntu, xdebug, 아파치, 우분투, 이클립스, 프로그래밍
- Response
- You can track responses via RSS / ATOM feed
- Posted
- Filed under 01010101
0. 문제
아마존에서 EC2 + ELB 조합으로 서버를 구성하면, 서버에 접속한 클라이언트의 IP 주소를 받아오지 못함1. 원인
Elastic Load Balancer 에 의해 $_SERVER["REMOTE_ADDR"] 가 감춰짐http://blog.svnlabs.com/get-remote-host-client-ip-behind-load-balancers-elb/
2. 해결
$_SERVER["HTTP_X_FORWARDED_FOR"] 를 이용3. CodeIgniter 적용
config.php 파일 수정[CODE]/*
|--------------------------------------------------------------------------
| Reverse Proxy IPs
|--------------------------------------------------------------------------
|
| If your server is behind a reverse proxy, you must whitelist the proxy IP
| addresses from which CodeIgniter should trust the HTTP_X_FORWARDED_FOR
| header in order to properly identify the visitor's IP address.
| Comma-delimited, e.g. '10.0.1.200,10.0.1.201'
|
*/
$config['proxy_ips'] = '여기에 ELB 아이피를 추가';[/CODE]
- Tag $_SERVER, $_SERVER["HTTP_X_FORWARDED_FOR"], $_SERVER["REMOTE_ADDR"], AWS, CI, Codeigniter, ELB, HTTP_X_FORWARDED_FOR, php, Programming, REMOTE_ADDR, 서버, 코드이그나이터, 프로그래밍
- Response
- You can track responses via RSS / ATOM feed
- Posted
- Filed under 01010101
[CODE]SET FOREIGN_KEY_CHECKS = 0;
TRUNCATE TABLE tablename;
SET FOREIGN_KEY_CHECKS = 1;[/CODE]
MySQL 5.5.7 부터 FOREIGN KEY 설정이 된 테이블을 TRUNCATE 하려면 FOREIGN_KEY_CHECKS을 0으로 지정해야한다. 안 그러면 Cannot truncate a table referenced in a foreign key constraint 오류가 발생한다.
TRUNCATE TABLE tablename;
SET FOREIGN_KEY_CHECKS = 1;[/CODE]
MySQL 5.5.7 부터 FOREIGN KEY 설정이 된 테이블을 TRUNCATE 하려면 FOREIGN_KEY_CHECKS을 0으로 지정해야한다. 안 그러면 Cannot truncate a table referenced in a foreign key constraint 오류가 발생한다.
- Tag error, FOREIGN KEY, mysql, Programming, TRUNCATE, 에러, 프로그래밍
- Response
- You can track responses via RSS / ATOM feed
nvm + node.js + npm + express 설치 및 nodepad 테스트 - 440번째 이야기
- Posted
- Filed under 01010101
각 홈페이지
node.js http://nodejs.org/nvm https://github.com/creationix/nvm
npm https://npmjs.org/
express.js http://expressjs.com/
mongodb http://docs.mongodb.org/manual/
nodepad https://github.com/alexyoung/nodepad
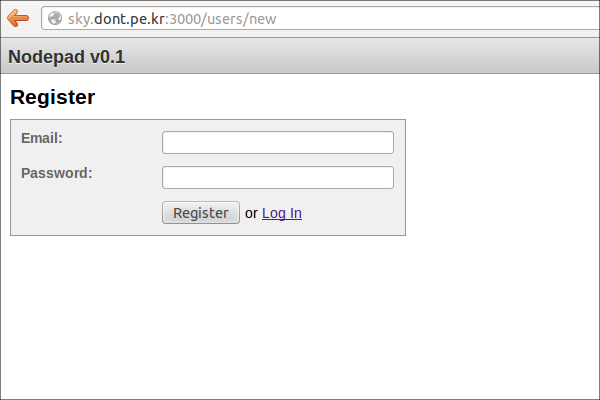
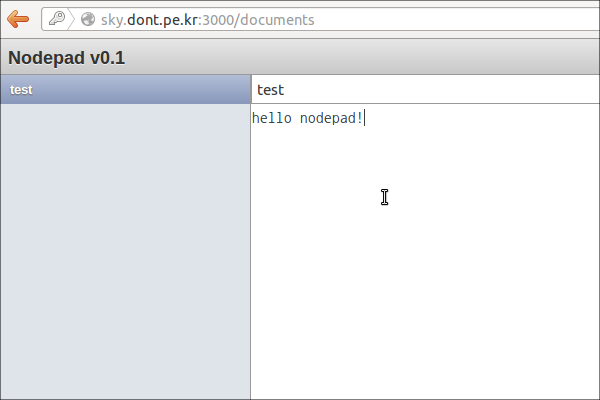
프리뷰
1. nvm 을 이용해서 node.js 설치 및 버전 관리2. npm 을 이용해서 express 등 필요한 모듈 관리
3. express 샘플 프로젝트 nodepad 소스 받아서 실행해보기
4. nodepad 에 필요한 mongodb 설치
nvm 설치
[CODE]$ wget https://raw.github.com/creationix/nvm/master/install.sh$ . install.sh[/CODE]
node.js 설치
[CODE]$ nvm install 0.8.14$ nvm alias default 0.8.14[/CODE]
npm 설치
[CODE]$ wget https://npmjs.org/install.sh$ . install.sh[/CODE]
express 설치
[CODE]$ npm install -g express[/CODE]nodepad 소스 받아오기 및 의존 패키기 설치 및 실행
mongodb 를 설치하지 않으면, 처음 실행하고 회원가입 할 때 에러가 발생합니다.[CODE]$ git clone https://github.com/alexyoung/nodepad.git nodepad
$ cd nodepad
$ npm install
$ node app[/CODE]
mongodb 설치
http://docs.mongodb.org/manual/tutorial/install-mongodb-on-debian/[CODE]$ sudo apt-key adv --keyserver keyserver.ubuntu.com --recv 7F0CEB10
$ sudo vi /etc/apt/sources.list.d/mongodb-10gen.list
deb http://downloads-distro.mongodb.org/repo/debian-sysvinit dist 10gen
$ sudo apt-get update
$ sudo apt-get install mongodb-10gen
$ sudo /etc/init.d/mongodb start[/CODE]
코드는 나중에 브라우저 테스트 먼저!
http://localhost:3000 접속!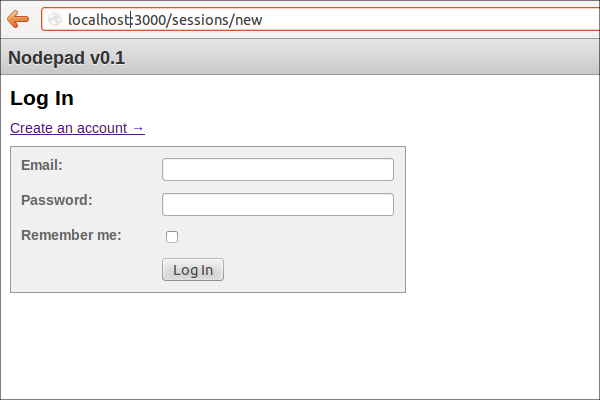
- Response
- You can track responses via RSS / ATOM feed
Vim + Vundle - 439번째 이야기
- Posted
- Filed under 01010101
Vundle 소개
Vundle 프로젝트 홈페이지 https://github.com/gmarik/vundleKLDP Vundle 소개 글타래 http://kldp.org/node/125263
Vundle 설치 하기
1. vim 플러그인 디렉토리 만들기
[CODE]$ mkdir ~/.vim/bundle[/CODE]2. Vundle 설치
[CODE]$ git clone https://github.com/gmarik/vundle.git ~/.vim/bundle/vundle[/CODE]3. Vundle 설정
.vimrc 에 아무 내용없이 아래 내용만 들어가도 됩니다.[CODE]$ vi .vimrc
set nocompatible " be iMproved
filetype off " required!
set rtp+=~/.vim/bundle/vundle/
call vundle#rc()
" let Vundle manage Vundle
" required!
Bundle 'gmarik/vundle'
" My Bundles here:
"
" original repos on github
Bundle 'tpope/vim-fugitive'
Bundle 'Lokaltog/vim-easymotion'
Bundle 'rstacruz/sparkup', {'rtp': 'vim/'}
Bundle 'tpope/vim-rails.git'
" vim-scripts repos
Bundle 'L9'
Bundle 'FuzzyFinder'
" non github repos
Bundle 'git://git.wincent.com/command-t.git'
" ...
filetype plugin indent on " required!
"
" Brief help
" :BundleList - list configured bundles
" :BundleInstall(!) - install(update) bundles
" :BundleSearch(!) foo - search(or refresh cache first) for foo
" :BundleClean(!) - confirm(or auto-approve) removal of unused bundles
"
" see :h vundle for more details or wiki for FAQ
" NOTE: comments after Bundle command are not allowed..[/CODE]
4. Vundle 사용하기
vi 화면에서- :BundleSearch 를 이용해서 설치 가능한 번들을 찾고
- My Bundles here: 부분에 설치 할려는 번들을 추가한 후에
- :BundleInstall 을 실행합니다.
:BundleInstall[/CODE]
- Response
- You can track responses via RSS / ATOM feed
- Posted
- Filed under 01010101
0. 기본 환경
1. 안드로이드 개발 환경
2. 에뮬레이터 속도 개선 X86
3. 에뮬레이터 속도 개선 다른 방법
0. 기본 환경
Ubuntu 12.04
Java version 1.6.0
Eclipse Juno
http://www.eclipse.org/downloads/1. 안드로이드 개발 환경
ADT Plugin
http://developer.android.com/intl/ko/tools/sdk/eclipse-adt.htmlAndroid SDK
http://developer.android.com/intl/ko/sdk/index.html2. 에뮬레이터 속도 개선
Intel® Hardware Accelerated Execution Manager
http://software.intel.com/en-us/articles/intel-hardware-accelerated-execution-manager/KVM
https://help.ubuntu.com/community/KVM/InstallationEclipse Configure
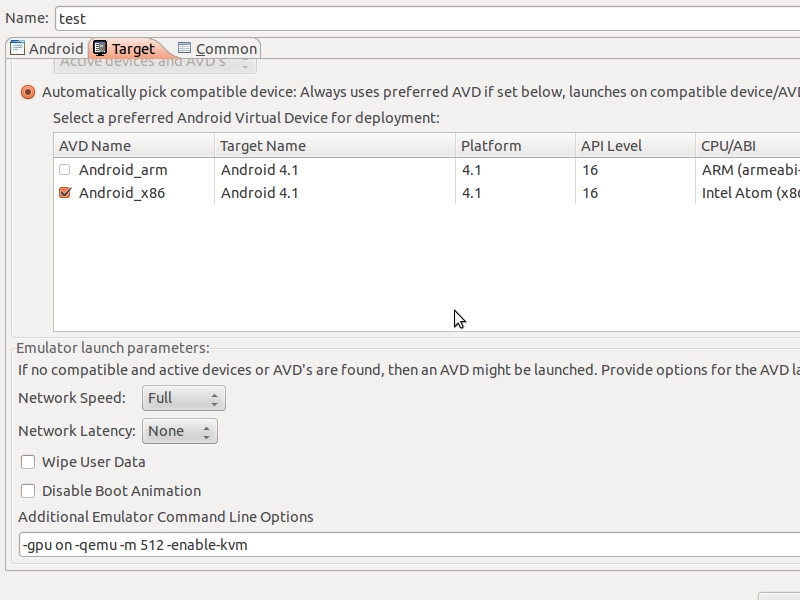
1. Android Virtual Device Manager - New - CPU/ABI - Intel Atom (X86)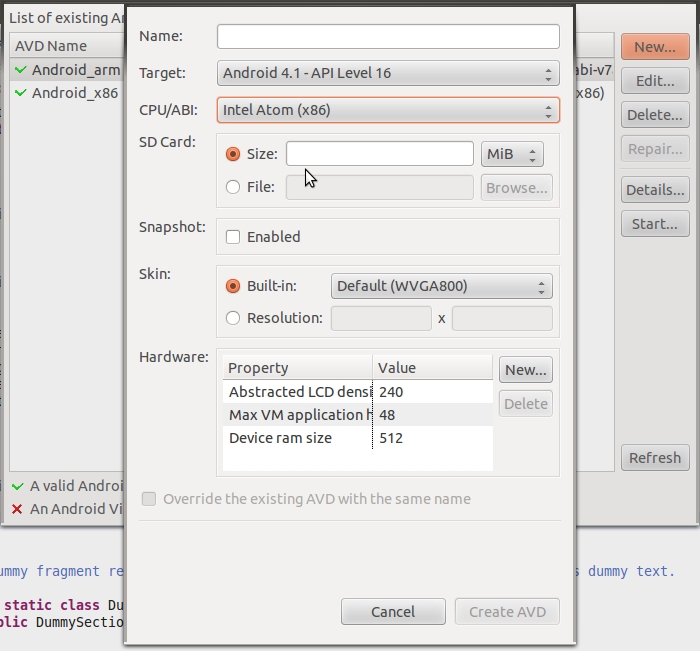
2. Eclipse - Run - Run Configuration - Target - Additional Emulator Connamd Line Option
[CODE]-gpu on -qemu -m 512 -enable-kvm[/CODE]
3. 에뮬레이터 속도 개선 다른 방법
[CODE]-gpu on -cpu-delay 0 -no-boot-anim[/CODE]- Response
- You can track responses via RSS / ATOM feed
- Posted
- Filed under 01010101
1. Install FreeTDS and the PHP MS SQL extension
2. Configure FreeTDS
3. Test FreeTDS using server name
4. Confiure Codeigniter
1. Install FreeTDS and the PHP MS SQL extension
[CODE]$ sudo apt-get install freetds-common freetds-bin php5-sybase[/CODE]php5-sybase: This package provides a module for Sybase and Microsoft SQL Server
database connections directly from PHP scripts.
2. Configure FreeTDS
[CODE]$ vi /etc/freetds/freetds.conf[yourserver]
host = your.server.name
port = 1433
tds version = 8.0[/CODE]
3. Test FreeTDS using server name
[CODE]$ tsql -S yourserver -U username -D databasename[/CODE]4. Confiure Codeigniter
[CODE]$db['default']['hostname'] = 'yourserver';$db['default']['username'] = 'username';
$db['default']['password'] = 'password';
$db['default']['database'] = 'databasename';
$db['default']['dbdriver'] = 'mssql';[/CODE]
- Tag CI, Codeigniter, MS SQL Server, MSSQL, php, 데이터베이스, 프로그래밍
- Response
- You can track responses via RSS / ATOM feed
nginx, php-fpm 상태 확인하기 - 408번째 이야기
- Posted
- Filed under 01010101
1. nginx 설정
2. php-fpm 설정
3. nginx, php-fpm 상태 확인하기
1. nginx 설정
[CODE]server {root /usr/share/nginx/www;
index index.html index.htm;
# Make site accessible from http://localhost/
server_name localhost;
auth_basic "Restricted Access";
auth_basic_user_file /usr/share/nginx/www/.htpasswd;
location / {
try_files $uri $uri/ /index.html;
}
location ~ \.php$ {
fastcgi_split_path_info ^(.+\.php)(/.+)$;
# NOTE: You should have "cgi.fix_pathinfo = 0;" in php.ini
# With php5-cgi alone:
fastcgi_pass 127.0.0.1:9000;
# With php5-fpm:
#fastcgi_pass unix:/var/run/php5-fpm.sock;
fastcgi_index index.php;
include fastcgi_params;
}
location = /status {
fastcgi_param SCRIPT_FILENAME /status;
fastcgi_pass 127.0.0.1:9000;
include fastcgi_params;
}
location /nginx_status {
stub_status on;
allow all;
deny all;
}
}[/CODE]
2. php-fpm 설정
[CODE]$ vi /etc/php5/fpm/pool.d/www.confpm.status_path = /status ; <- 주석 제거[/CODE]
3. nginx, php-fpm 상태 확인하기
브라우저에서 각각http://domain.com/nginx_status
http://domain.com/status
으로 확인합니다.
- Response
- You can track responses via RSS / ATOM feed
[AWS] MySQL on EC2 with EBS(Elastic Block Store) - 407번째 이야기
- Posted
- Filed under 01010101
1. Create EBS Volume
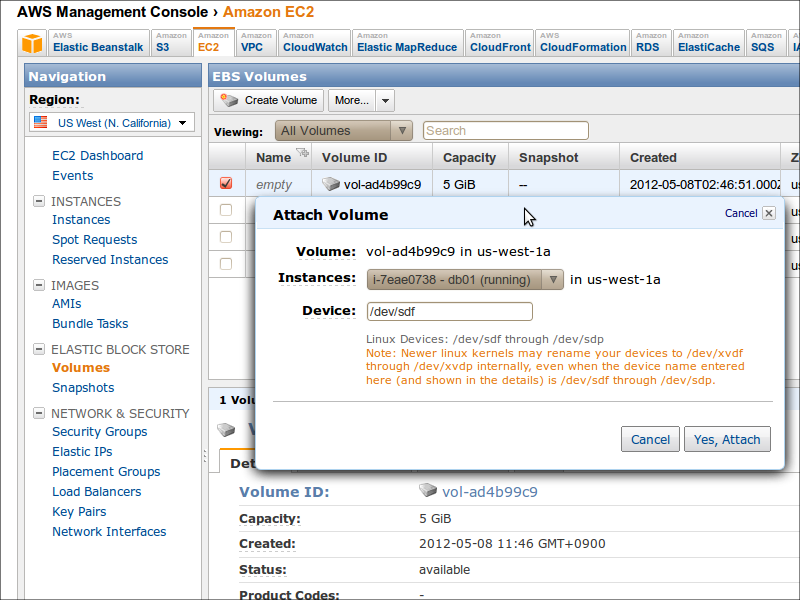
2. Attach the EBS volume
3. Create a file system and mount
4. Configuring MySQL to use the EBS volume
참고: http://aws.amazon.com/articles/16631. Create EBS Volume
EBS 볼륨을 생성합니다.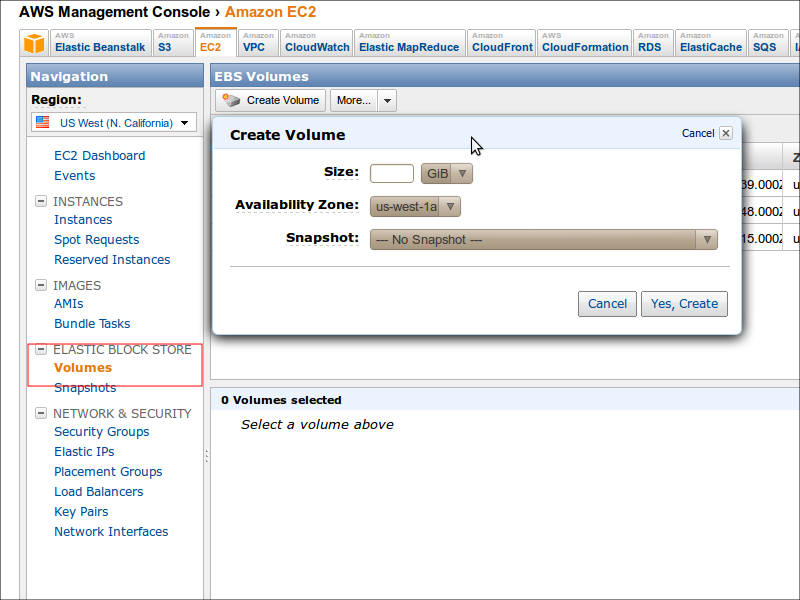
2. Attach the EBS volume

3. Create a file system and mount
[CODE]$ sudo apt-get install -y xfsprogs$ grep -q xfs /proc/filesystems || sudo modprobe xfs
$ sudo mkfs.xfs /dev/xvdf
$ echo "/dev/xvdf /vol xfs noatime 0 0" | sudo tee -a /etc/fstab
$ sudo mkdir -m 000 /vol
$ sudo mount /vol[/CODE]
4. Configuring MySQL to use the EBS volume
MySQL 중지[CODE]$ sudo /etc/init.d/mysql stop[/CODE]
MySQL 데이터 디렉토리 옮기기
[CODE]$ sudo mkdir /vol/etc /vol/lib /vol/log
$ sudo mv /etc/mysql /vol/etc/
$ sudo mv /var/lib/mysql /vol/lib/
$ sudo mv /var/log/mysql /vol/log/
$ sudo mkdir /etc/mysql
$ sudo mkdir /var/lib/mysql
$ sudo mkdir /var/log/mysql
$ echo "/vol/etc/mysql /etc/mysql none bind" | sudo tee -a /etc/fstab
$ sudo mount /etc/mysql
$ echo "/vol/lib/mysql /var/lib/mysql none bind" | sudo tee -a /etc/fstab
$ sudo mount /var/lib/mysql
$ echo "/vol/log/mysql /var/log/mysql none bind" | sudo tee -a /etc/fstab
$ sudo mount /var/log/mysql[/CODE]
MySQL 시작
[CODE]$ sudo /etc/init.d/mysql start[/CODE]
테스트
[CODE]$ mysql -u root -p[/CODE]
- Response
- You can track responses via RSS / ATOM feed
- Posted
- Filed under 01010101
[CODE]$ sudo apt-get install php5-sybase
$ sudo /etc/init.d/apache2 restart[/CODE]
Edit freetds.conf
[CODE]$ sudo vi /etc/freetds/freetds.conf
# A typical Microsoft server
[egServer70]
host = sqlserver_hostname
port = 1433
tds version = 7.0 [/CODE]
Edit CodeIgniter config/database.php
[CODE]$active_group = 'default';
$active_record = TRUE;
$db['default']['hostname'] = 'egServer70';
$db['default']['username'] = 'USERNAAME';
$db['default']['password'] = 'PASSWORD';
$db['default']['database'] = 'DATABASE';
$db['default']['dbdriver'] = 'mssql';
$db['default']['dbprefix'] = '';
$db['default']['pconnect'] = FALSE;
$db['default']['db_debug'] = TRUE;
$db['default']['cache_on'] = FALSE;
$db['default']['cachedir'] = '';
$db['default']['char_set'] = 'utf8';
$db['default']['dbcollat'] = 'utf8_general_ci';
$db['default']['swap_pre'] = '';
$db['default']['autoinit'] = TRUE;
$db['default']['stricton'] = FALSE;[/CODE]
CodeIgniter Code
[CODE]$this->load->database();
$query = $this->db->select('*')
->from('table')
->limit(1)
->get();
$row = $query->row_object();
print_r($row);[/CODE]
- Tag Codeigniter, Microsoft SQL Server, MSSQL, php, Programming, ubuntu, 우분투, 프로그래밍
- Response
- You can track responses via RSS / ATOM feed