DoNT
Do Not Think!!!
120 Entries : Results for 01010101
[AWS] Amazon EC2 설정 - 405번째 이야기
- Posted
- Filed under 01010101
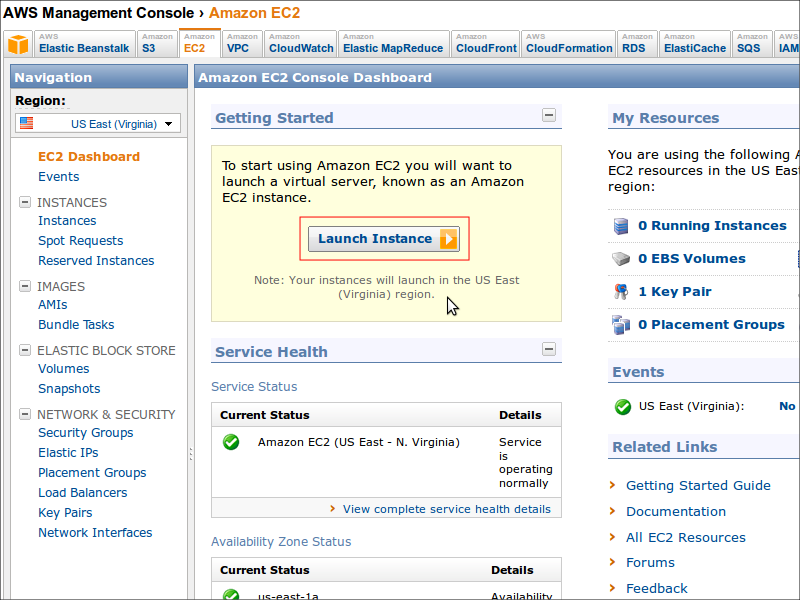
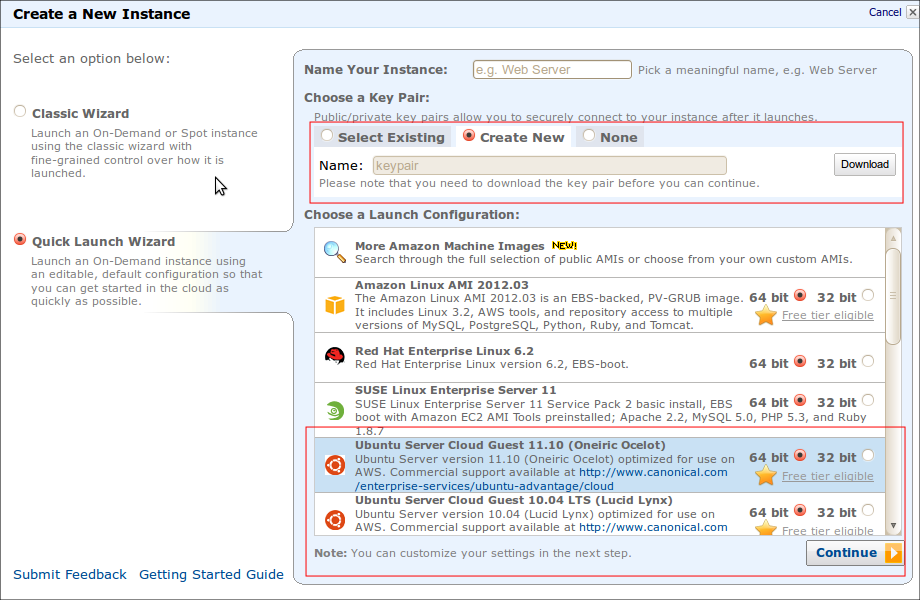
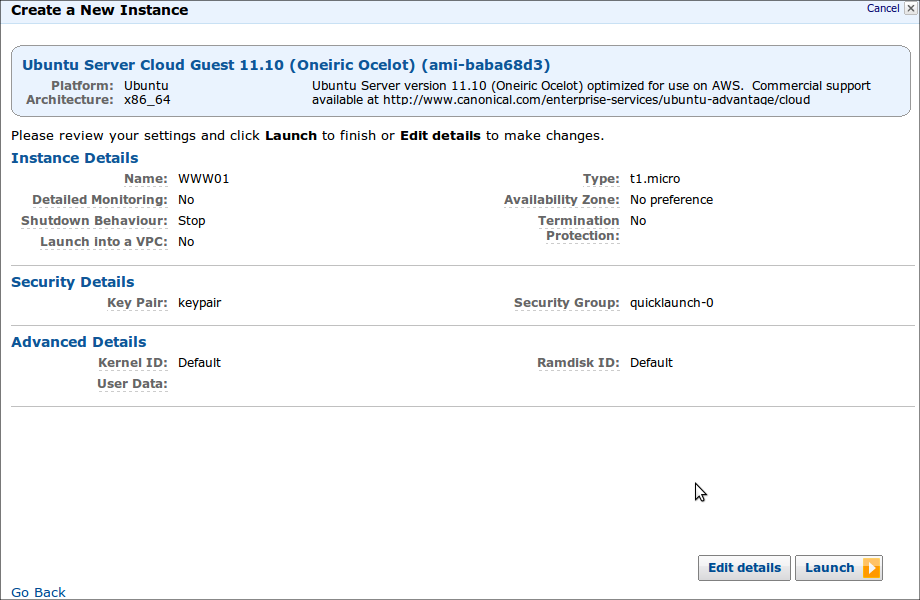
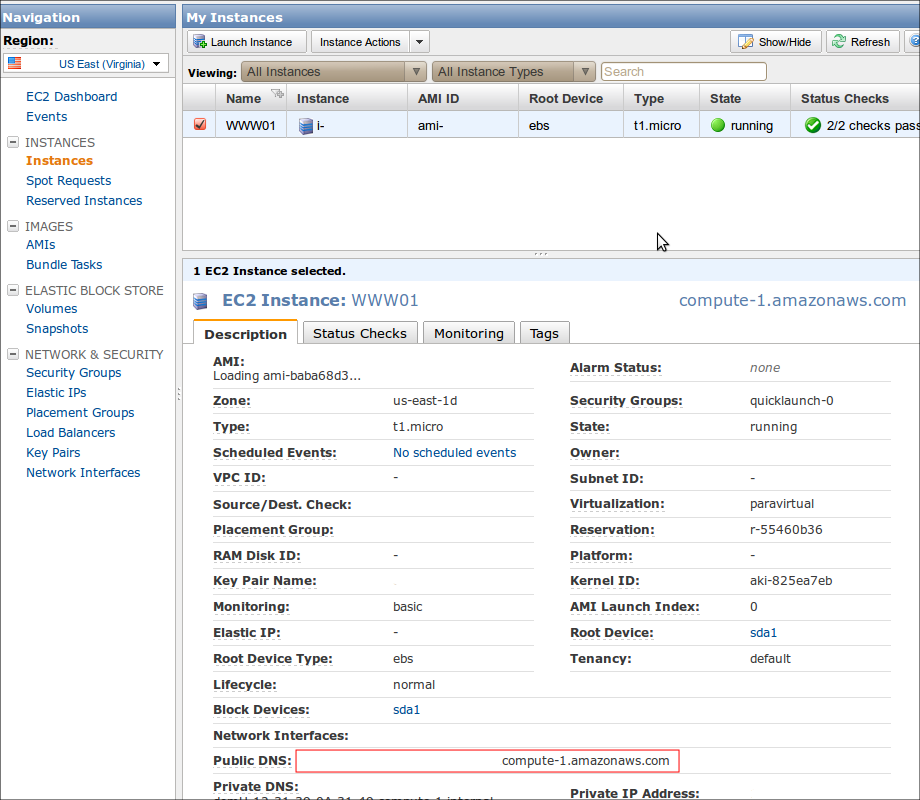
1. EC2 instance 생성
2. Key Pair
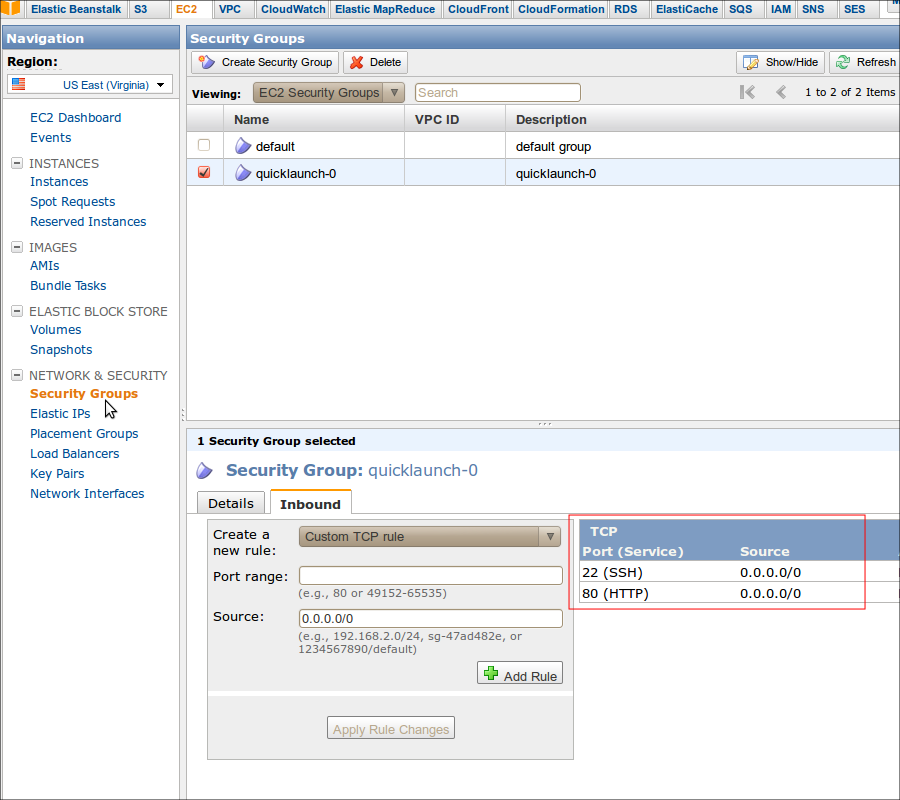
3. Security Groups 설정
4. SSH 접속
5. 웹서버 설치 (선택)
6. DB서버 설치 (선택)
1. EC2 instance 생성
2. Key Pair 생성 / 기존 Key Pair 선택
Key Pair 를 새로 만들거나 기존 Key Pair 를 선택합니다.Key Pair 는 ssh 접속을 위해 사용되는데, 나중에 다시 다운로드 받을 수 없기 때문에 잘 보관해야 합니다.
3. Security Groups 설정
4. SSH 접속
[CODE]$ mkdir .aws$ cp keypair.pem .aws/keypair.pem
$ chmod 400 .aws/keypair.pem
$ ssh -i .aws/keypair.pem ubuntu@XXX.compute-1.amazonaws.com[/CODE]
Ubuntu AMI 를 선택하면 기본 login user 가 ubuntu 입니다.
5. 웹서버 설치 (선택)
nginx + php-fpm
[CODE]$ sudo apt-get install -y python-software-properties$ sudo add-apt-repository -y ppa:nginx/stable
$ sudo apt-get update
$ sudo apt-get install -y nginx
$ sudo apt-get install -y php5 php5-cli php5-cgi php5-common php5-mysql php5-dev php5-mcrypt php5-fpm php5-curl php-pear php5-imagick
$ sudo /etc/init.d/php5-fpm start
$ sudo /etc/init.d/nginx start[/CODE]
6. DB서버 설치 (선택)
MySQL
[CODE]$ sudo apt-get install -y mysql-server$ sudo /etc/init.d/mysql start[/CODE]
- Response
- You can track responses via RSS / ATOM feed


nginx + php-fpm 에서 xdebug 동작 안하는 문제 - 404번째 이야기
- Posted
- Filed under 01010101
1. apache 에서는 잘 동작하던 xdebug 가 nginx + php-fpm 설치 후 xdebug 가 동작을 안합니다.
원인
xdebug 의 포트(9000)와 php-fpm 의 포트(9000)가 충돌 하기 때문에해결
xdebug 의 port 를 변경합니다.xdebug 설정파일 수정
[CODE]$ vi /etc/php5/conf.d/xdebug.inizend_extension=/usr/lib/php5/20090626+lfs/xdebug.so
xdebug.remote_enable=1
xdebug.remote_host=127.0.0.1
xdebug.remote_port=9001
xdebug.remote_handler=dbgp
xdebug.remote_autostart=0[/CODE]
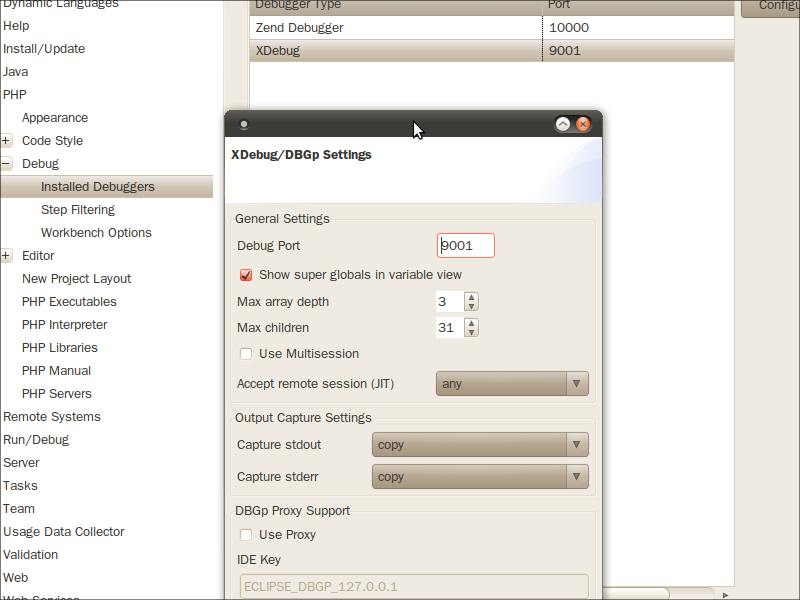
이클립스 설정 수정
이클립스 - Window - Preferences - PHP - Debug - Installed Debuggers - XDebug - ConfigureDebug port 를 9001 로 변경합니다.
2. xdebug 에서 local variables 이 보이지 않습니다.
원인
xdebug 버그입니다.해결
xdebug 를 업데이트 합니다.[CODE]$ wget http://xdebug.org/files/xdebug-2.1.4.tgz
$ tar -xvzf xdebug-2.1.4.tgz
$ cd xdebug-2.1.4
$ phpize
$ ./configure
$ make
$ cp modules/xdebug.so /usr/lib/php5/20090626+lfs
$ /etc/init.d/apache2 restart[/CODE]
- Response
- You can track responses via RSS / ATOM feed
우분투 10.04 nginx + phpmyadmin 설정하기 - 402번째 이야기
- Posted
- Filed under 01010101
우분투 10.04 에 nginx + phpmyadmin 설정하기
개발환경으로 apache + php + mysql + phpmyadmin 을 설치해서 사용하는데,
apache 대신 nginx 로 바꾸면서 삽질한 내용입니다.
참고
http://wiki.nginx.org/Installhttp://www.justincarmony.com/blog/2011/10/24/setting-up-nginx-php-fpm-on-ubuntu-10-04/
http://www.base-10.net/blog/2009/11/06/nginx-and-non-document-root-phpmyadmin/
0. 다른건 이미 설치가 되어 있는 상황에서, nginx 만 설치합니다.
[CODE]$ sudo apt-get install nginx[/CODE][CODE]$ sudo apt-get install python-software-properties
# sudo add-apt-repository ppa:brianmercer/php
$ sudo apt-get update
$ sudo apt-get install php5-fpm[/CODE]
1. http://localhost/phpmyadmin 으로 접속하기 위해 /etc/nginx/sites-enabled/default 파일을 수정합니다.
나머지는 기본으로 설정되어 있는 내용이고, 노란색 부분만 추가했습니다.[CODE]server {
listen 80 default;
server_name localhost;
access_log /var/log/nginx/localhost.access.log;
location / {
root /var/www/nginx-default;
index index.html index.htm;
}
location /doc {
root /usr/share;
autoindex on;
allow 127.0.0.1;
deny all;
}
location /images {
root /usr/share;
autoindex on;
}
location /phpmyadmin {
root /var/www/nginx-default;
index index.php;
}
location ~ ^/phpmyadmin.+\.php$ {
root /var/www/nginx-default;
fastcgi_pass 127.0.0.1:9000;
fastcgi_index index.php;
fastcgi_param SCRIPT_FILENAME $document_root$fastcgi_script_name;
include fastcgi_params;
}
}[/CODE]
2. www 디렉토리에 phpmyadmin 심볼릭링크를 만듭니다.
[CODE]$ cd /var/www/nginx-default$ sudo ln -s /usr/share/phpmyadmin phpmyadmin[/CODE]
- Tag nginx, phpmyadmin, ubuntu, 개발환경, 우분투
- Response
- You can track responses via RSS / ATOM feed
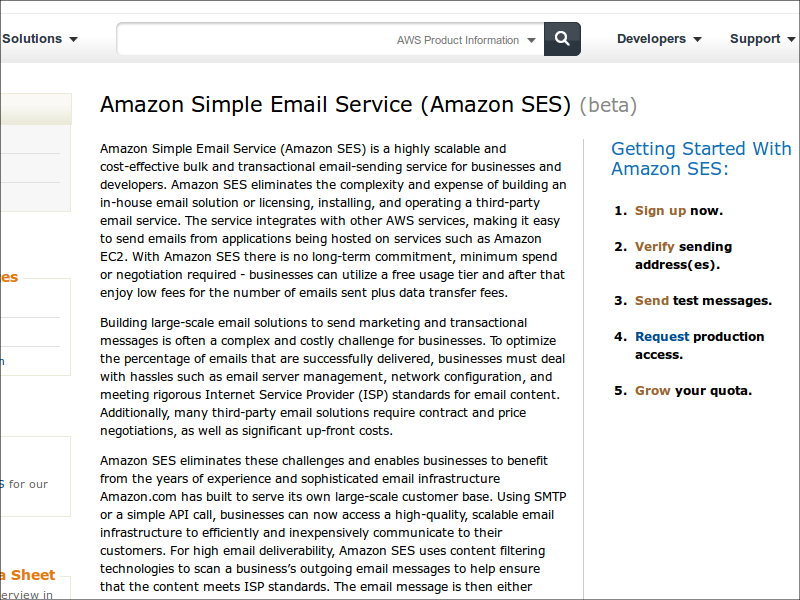
[AWS] Simple Email Service 설정하기 - 401번째 이야기
- Posted
- Filed under 01010101
0. 준비
1. Sign Up
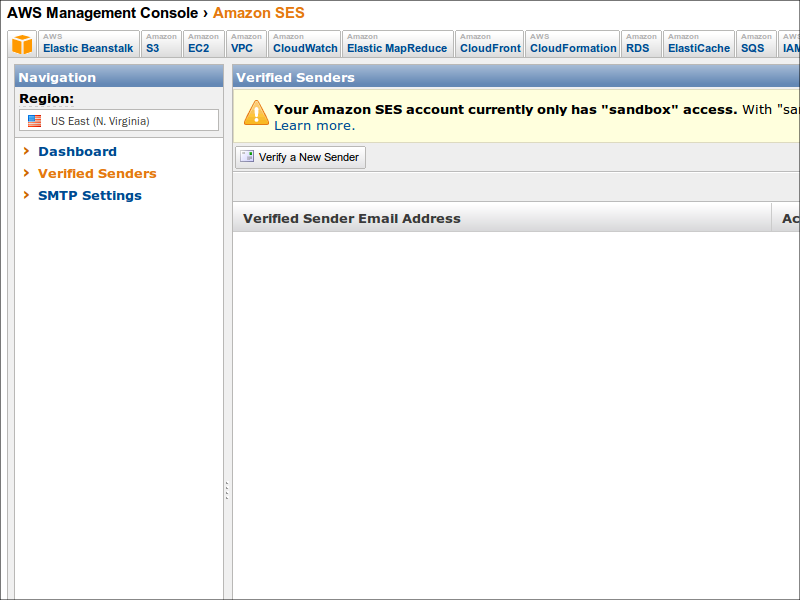
2. AWS Management Console
3. Simple Email Service 선택
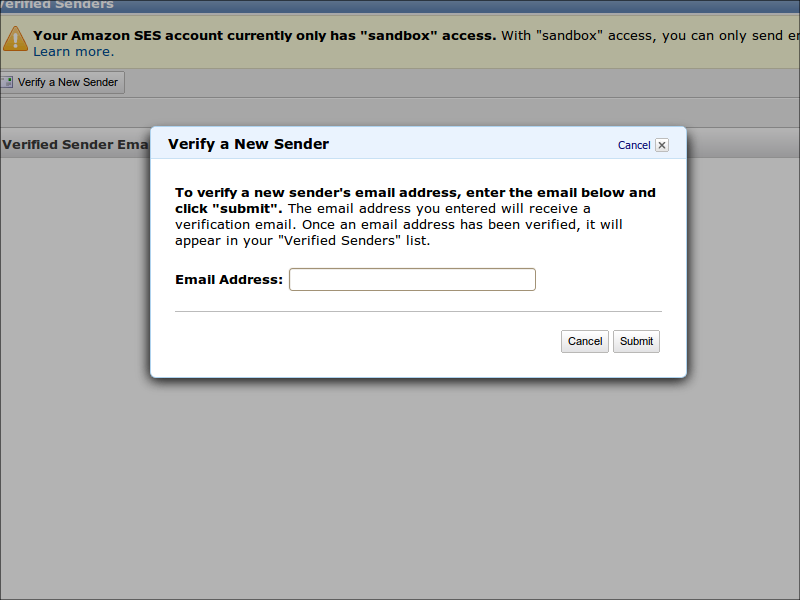
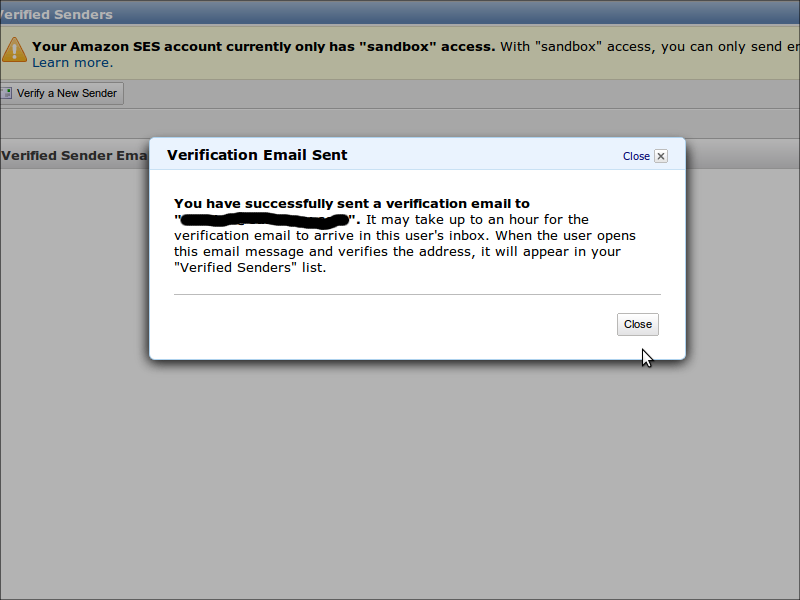
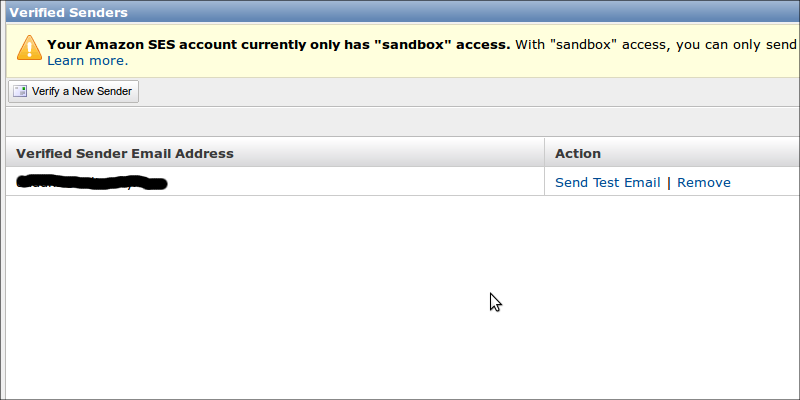
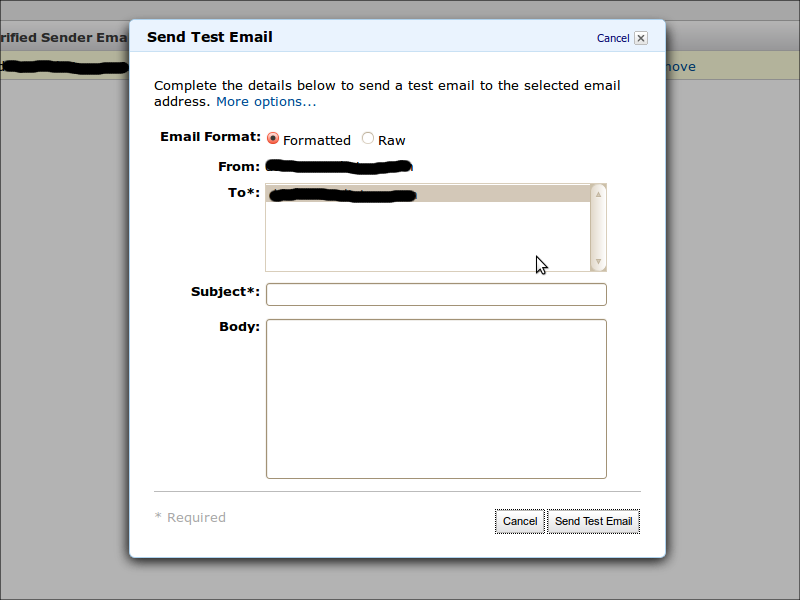
4. 이메일 인증
5. SMTP 설정 (선택)
6. 인증서 생성 (선택)
7. SMTP 확인 (선택)
8. SES API를 이용해서 PHP 에서 이메일 보내기
0. 준비
적용 환경: PHP + CodeIgniter참고: http://docs.amazonwebservices.com/ses/latest/DeveloperGuide/Welcome.html
1. Sign Up Now
Amazon Simple Email Service 서비스에 로그인을 합니다.참고: http://dont.pe.kr/tt/382
2. AWS Management Console
AWS 관리 콘솔에 접속합니다.
3. Simple Email Service 선택
SES 탭을 선택합니다.
4. 이메일 인증
SES 를 테스트하기 위해서는 인증된 이메일로만 메일을 전송할 수 있습니다.(테스트 완료 후 별도로 production 모드로 전환해야 합니다.)
5. SMTP 설정 (선택)
SMTP 로 메일을 보내기 위한 설정입니다.
6. 인증서 생성 (선택)
SMTP 인증서를 만듭니다.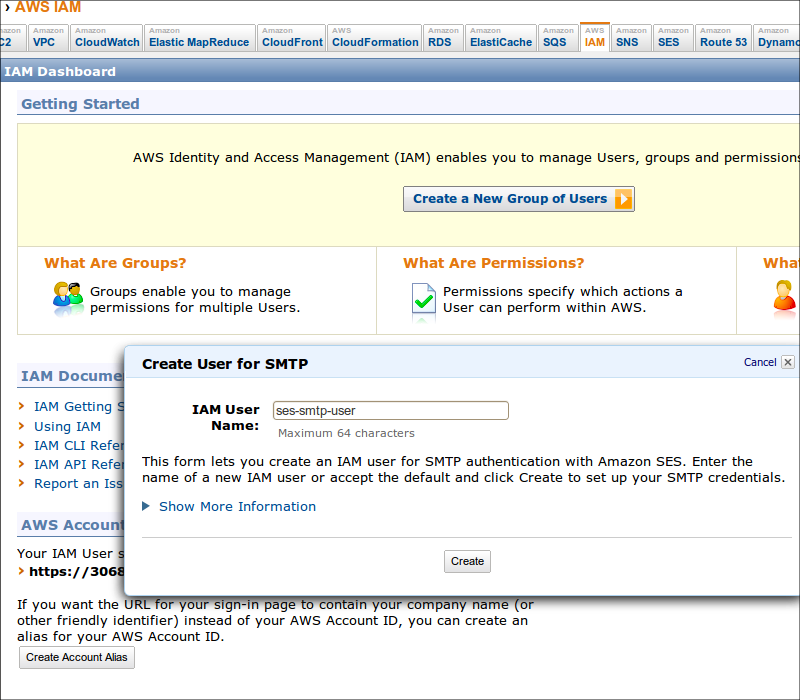

7. SMTP 확인 (선택)
이메일이 보내지는 지 확인합니다.[CODE]openssl s_client -quiet -crlf -connect email-smtp.us-east-1.amazonaws.com:465
또는
openssl s_client -quiet -crlf -starttls smtp -connect email-smtp.us-east-1.amazonaws.com:25[/CODE]
[CODE]openssl s_client -quiet -crlf -connect email-smtp.us-east-1.amazonaws.com:465
...
EHLO localhost
...
AUTH LOGIN
...
<base64 로 인코딩된 Smtp Username>
..
<base64 로 인코딩된 Smtp Password>
...
MAIL FROM:duddns@cultstory.com
...
RCPT TO:duddns@cultstory.com
...
DATA
Subject:Hello from Amazon SES!
This email was sent using the Amazon SES SMTP interface.
.[/CODE]
8. SES API를 이용해서 PHP 에서 이메일 보내기
SES API 를 이용하기 때문에 5. 6. 7. 과정이 필요 없습니다.https://github.com/joelcox/codeigniter-amazon-ses
CodeIgniter 라이브러리를 추가해서 이메일을 보냅니다.
8.1 access_key/secret_key 생성
Account - Security Credentials - Access Credentials - Access Keys Tab- Tag Amazon, Amazon Web Services, AWS, SES, Simple Email Service, 아마존
- Response
- You can track responses via RSS / ATOM feed
[iOS] NSDate 를 Core Data 에 저장할 때 - 390번째 이야기
- Posted
- Filed under 01010101
NSDate 와 코어데이터의 Dates and Times
NSDate[CODE]The sole primitive method of
NSDate, timeIntervalSinceReferenceDate, provides the basis for all the other methods in the NSDate interface. This method returns a time value relative to an absolute reference date—the first instant of 1 January 2001, GMT.[/CODE]Core Data Dates and Times
[CODE]NSManagedObject represents date attributes using NSDate objects, and stores times internally as an NSTimeInterval
value since the reference date (which has a time zone of GMT). Time
zones are not explicitly stored—indeed you should always represent a
Core Data date attribute in GMT, this way searches are normalized in the
database. If you need to preserve the time zone information, you need
to store a time zone attribute in your model. This may again require you
to create a subclass of NSManagedObject.[/CODE]Core Data 에 NSDate 를 저장하면,
2001-01-01 00:00:00 을 기준으로 한 time interval (double) 이 저장됩니다.이 때, 기준이 되는 타임존은 Local TimeZone -> GMT 입니다.
예를 들면
한국에서 2011-11-25 11:21:02 라는 시간을 Core Data 에 저장하면
한국의 타임존 2011-11-25 11:21:02 +0900 이 아니라
GMT 2011-11-25 02:21:02 +0000 라는 시간이
1970-01-01 00:00:00 을 기준으로 한 time interval 1322187662 이 아니라, (timeIntervalSince1970)
2001-01-01 00:00:00 을 기준으로 한 time interval 343880462 가 저장됩니다. (timeIntervalSinceReferenceDate)
Core Data 에서 불러오면
2001-01-01 00:00:00 을 기준으로 한 time interval 으로 NSDate 객체를 만듦니다.이 때, 기준이 되는 타임존은 GMT -> Local TimeZone 입니다.
예를 들면
저장된 343880462 을 한국에서 불러오면,
GMT 2011-11-25 02:21:02 +0000 라는 시간이 안니라,
한국의 타임존 2011-11-25 11:21:02 +0900 라는 시간이 만들어집니다.
하지만, 저장된 343880462 을 홍콩에서 불러오면
홍콩의 타임존 2011-11-25 10:21:02 +0800 라는 시간이 만들어집니다.
타임존을 이동하는 경우,
작성된 시간을 보여주기 위해서는해당 타임존을 별도로 저장하고, 저장된 타임존을 이용해서 시간을 표시해야 합니다.
- Response
- You can track responses via RSS / ATOM feed
X없는 그루폰 첫 화면 - 389번째 이야기
- Posted
- Filed under 01010101

덧: 아래쪽 이미 등록하셨나요? 를 누르면 사라진다는군요.
- Response
- You can track responses via RSS / ATOM feed
[iOS] UIButton 에서 UITextField 처럼 커스텀 키보드 사용하기 - 386번째 이야기
- Posted
- Filed under 01010101
그 중에서 버튼을 누르면 UITextField 처럼 하단에서 커스텀 키보드가 나오도록 하는 방법입니다.
UIButton 을 상속받아서 UIResponder 의 - (BOOL)canBecomeFirstResponder 를 구현합니다.
CustomButton.h
[CODE]//
// CustomButton.h
//
// Created by Cho, Young-Un on 11. 9. 2..
// Copyright 2011 cultstory.com. All rights reserved.
//
#import <UIKit/UIKit.h>
@interface CustomButton : UIButton {
@private
UIView *_inputView;
}
@property (nonatomic, retain) UIView *inputView;
@end[/CODE]
CustomButton.m
[CODE]//
// CustomButton.m
//
// Created by Cho, Young-Un on 11. 9. 2..
// Copyright 2011 cultstory.com. All rights reserved.
//
#import "CustomButton.h"
@implementation CustomButton
@synthesize inputView=_inputView;
- (void)dealloc {
[_inputView release];
[super dealloc];
}
- (BOOL)canBecomeFirstResponder {
return YES;
}
@end[/CODE]
사용법
[CODE]UIPickerView *pickerView = [[[UIPickerView alloc] initWithFrame:CGRectMake(0, 10, 320, 216)] autorelease];
pickerView.delegate = self;
pickerView.dataSource = self;
pickerView.showsSelectionIndicator = YES;
CustomButton customButton = [[CustomButton alloc] initWithFrame:CGRectMake(10, 10, 300, 40)];
customButton.inputView = pickerView;
[button becomeFirstResponder];[/CODE]
- Tag custom, custom keyboard, iOS, Keyboard, Programming, UIButton, UITextField, 아이폰, 키보드, 프로그래밍
- Response
- You can track responses via RSS / ATOM feed
[iOS] UITextField custom keyboard 사용하기 - 385번째 이야기
- Posted
- Filed under 01010101
이 기본 키보드 대신 UIPickerView 또는 UIDatePicker 등을 사용하고 싶을 때가 있습니다.
이 경우 iOS 3.2 부터 생긴 inputView 속성을 이용하면 간단하게 커스텀 키보드를 이용할 수 있습니다.
기본 키보드 사용
[CODE]UITextField textField = [[UITextField alloc] initWithFrame:CGRectMake(10, 10, 300, 40)];[/CODE]
기본 키보드 대신 UIDatePicker 사용
[CODE]UIPickerView *pickerView = [[[UIPickerView alloc] initWithFrame:CGRectMake(0, 10, 320, 216)] autorelease];
pickerView.delegate = self;
pickerView.dataSource = self;
pickerView.showsSelectionIndicator = YES;
UITextField textField = [[UITextField alloc] initWithFrame:CGRectMake(10, 10, 300, 40)];
inputField.inputView = pickerView;[/CODE]
- Tag custom, custom keyboard, iOS, Keyboard, Programming, UITextField, 키보드, 프로그래밍
- Response
- You can track responses via RSS / ATOM feed
[iOS] iOS 버전 확인 macro - 384번째 이야기
- Posted
- Filed under 01010101
하지만 이거 때문에 이전 버전의 아이폰 사용자가 앱을 사용할 수 없게 만들 수는 없습니다.
그래서, 아이폰 버전을 확인 해서 4.1 이후 버전의 사용자와 이전 버전의 사용자에게 다른 키보드를 보여줘야 합니다.
iOS 버전을 확인하는 매크로
[CODE]#define SYSTEM_VERSION_EQUAL_TO(v) ([[[UIDevice currentDevice] systemVersion] compare:v options:NSNumericSearch] == NSOrderedSame)
#define SYSTEM_VERSION_GREATER_THAN(v) ([[[UIDevice currentDevice] systemVersion] compare:v options:NSNumericSearch] == NSOrderedDescending)
#define SYSTEM_VERSION_GREATER_THAN_OR_EQUAL_TO(v) ([[[UIDevice currentDevice] systemVersion] compare:v options:NSNumericSearch] != NSOrderedAscending)
#define SYSTEM_VERSION_LESS_THAN(v) ([[[UIDevice currentDevice] systemVersion] compare:v options:NSNumericSearch] == NSOrderedAscending)
#define SYSTEM_VERSION_LESS_THAN_OR_EQUAL_TO(v) ([[[UIDevice currentDevice] systemVersion] compare:v options:NSNumericSearch] != NSOrderedDescending)[/CODE]
매크로 사용법
[CODE]textField.keyboardType = UIKeyboardTypeNumbersAndPunctuation;
if (SYSTEM_VERSION_GREATER_THAN_OR_EQUAL_TO(@"4.1")) {
textField.keyboardType = UIKeyboardTypeDecimalPad;
}[/CODE]
참고: http://stackoverflow.com/questions/3339722/check-iphone-ios-version
- Response
- You can track responses via RSS / ATOM feed
[iOS] UITextField padding 적용하기 - 383번째 이야기
- Posted
- Filed under 01010101
UITextField 를 상속받는 서브클래스를 만들어야 합니다.
서브클래스를 만들어서, 아래 메소드를 override 하고,
[CODE]- (CGRect)textRectForBounds:(CGRect)bounds;
- (CGRect)editingRectForBounds:(CGRect)bounds;
[/CODE]
그리고, padding 값을 변경 할 수 있도록,
"paddingX" "paddingY" properties 를 추가합니다.
 CSTextField.h
[CODE]//
// CSTextField.h
//
// Created by Cho, Young-Un on 11. 9. 17..
// Copyright 2011 cultstory.com. All rights reserved.
//
#import <Foundation/Foundation.h>
@interface CSTextField : UITextField {
@private
NSInteger _paddingX;
NSInteger _paddingY;
}
@property (nonatomic, assign) NSInteger paddingX;
@property (nonatomic, assign) NSInteger paddingY;
@end[/CODE]
[CODE]//
// CSTextField.m
//
// Created by Cho, Young-Un on 11. 9. 17..
// Copyright 2011 cultstory.com. All rights reserved.
//
#import "CSTextField.h"
@implementation CSTextField
@synthesize paddingX=_paddingX, paddingY=_paddingY;
- (CGRect)textRectForBounds:(CGRect)bounds {
return CGRectMake(bounds.origin.x + _paddingX,
bounds.origin.y + _paddingY,
bounds.size.width - (_paddingX * 2),
bounds.size.height - (_paddingY * 2));
}
- (CGRect)editingRectForBounds:(CGRect)bounds {
return [self textRectForBounds:bounds];
}
@end[/CODE]
참고: http://stackoverflow.com/questions/3727068/set-padding-for-uitextfield-with-uitextborderstylenone
- Tag iOS, iPhone, Objective-C, padding, Programming, UITextField, UITextField padding, 아이폰, 프로그래밍
- Response
- You can track responses via RSS / ATOM feed